Create your own PowerPoint add-in!
It is possible and fairly easy to create your own PowerPoint add-in to get an easy access to your custom macros.
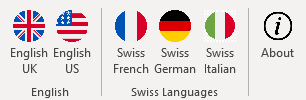
As an example, I created an additional tab in the PowerPoint ribbon that let me change the spellcheck language of all text boxes in a presentation. It looks like this:
Although this post is focused on PowerPoint, I suppose that the process is very similar for the other Office applications.
Step 1 - Create your VBA macros.
- Create a new PowerPoint document.
- To access the VBA editor in PowerPoint you need to enable the developer tools. To do so, go to File > Options > Customize Ribbon, and check the “Developer” box in the right column.
- In the Developer tab, open Visual Basic, create a new module and add your macros there. Save and exit the editor.
- You can now see your macros if you click on the “Macro” button in the “Developer” tab.
- Save the presentation. As you added macros to the document, you will need to save it as a PowerPoint Macro-Enabled Presentation (
.pptm)
Sub SpellCheckChanger(langID As MsoLanguageID)
ActivePresentation.DefaultLanguageID = langID
Dim Sld As Slide, Shp As Shape
For Each Sld In ActivePresentation.Slides
    For Each Shp In Sld.Shapes
        If Shp.HasTextFrame Then
            Shp.TextFrame.TextRange.LanguageID = langID
        End If
    Next
Next
End Sub

Sub SpellCheckChanger_UK()
    SpellCheckChanger (msoLanguageIDEnglishUK)
    MsgBox ("Language has been changed to English UK")
End Sub

Sub SpellCheckChanger_US()
    SpellCheckChanger (msoLanguageIDEnglishUS)
    MsgBox ("Language has been changed to English US")
End Sub

Sub SpellCheckChanger_CHFR()
    SpellCheckChanger (msoLanguageIDSwissFrench)
    MsgBox ("Language has been changed to Swiss French")
End Sub

Sub SpellCheckChanger_CHDE()
    SpellCheckChanger (msoLanguageIDSwissGerman)
    MsgBox ("Language has been changed to Swiss German")
End Sub

Sub SpellCheckChanger_CHIT()
    SpellCheckChanger (msoLanguageIDSwissItalian)
    MsgBox ("Language has been changed to Swiss Italian")
End Sub

Sub About()
    MsgBox ("This add-in comes with absolutely no guarantee.")
End Sub
Step 2 - Customize the Office ribbon
The Office ribbon can be customized by adding some XML to your document.
The easy way is to use the Office RibbonX Editor. I would recommend using the NETFramework-Binaries.zip, as no installation or admin rights are needed.
Once you have the ribbon editor:
- Drag & drop the file you created in step 1 into the editor.
- Right click on the presentation in the editor > “Insert Office 2010+ Custom UI Part”
- In the
customUI14.xml, add the XML for the ribbon (see below). - Use the “Insert Icons” button to insert image files for the icons (in my case, all the flags).
- Save and exit the ribbon editor.
<customUI xmlns=http://schemas.microsoft.com/office/2006/01/customui>
    <ribbon>
        <tabs>
            <tab id="CustomTab" label="SpellCheck Changer">
                <group id="CustomGroup1" label="English">
                    <button id="Button1" label="English UK" image="uk_flag" size="large" onAction="SpellCheckChanger_UK" />
                    <button id="Button2" label="English US" image="us_flag" size="large" onAction="SpellCheckChanger_US" />
                </group >
                <group id="CustomGroup2" label="Swiss Languages">
                    <button id="Button3" label="Swiss French" image="fr_flag" size="large" onAction="SpellCheckChanger_CHFR" />
                    <button id="Button4" label="Swiss German" image="de_flag" size="large" onAction="SpellCheckChanger_CHDE" />
                    <button id="Button5" label="Swiss Italian" image="it_flag" size="large" onAction="SpellCheckChanger_CHIT" />
                </group >
                <group id="CustomGroup3" label=" ">
                    <button id="Button6" label="About" image="about" size="large" onAction="About" />
                </group >
            </tab>
        </tabs>
    </ribbon>
</customUI>
Step 3 - Make it a PowerPoint add-in
If you open your presentation with PowerPoint you should now see your new tab in the ribbon. Now we need to add it as a PowerPoint add-in so that it will appear in all presentation you’re working on.
- Save the presentation as a PowerPoint Add-in (
.ppam). This should automaticaly save it to default location for add-ins. - In the Developer tab > PowerPoint Add-ins > Add New, and select the file you just created.
- Ensure the box next to your new add-in is checked and close the Add-ins window.
And voilà.